Read the Modules for the Cs Ta Class Before Class Next Week
Like shooting fish in a barrel Ways to Pass and Receive Information with Flutter Stateful and Stateless Widgets or Pages
2021 Novice App Developers Guide
![]()
This is the simplest and complete 2021 guide for novice flutter developers who are having trouble with passing/fetching data between their flutter app pages. With the help of this, I'll also explain a little about writing cleaner code at the stop. I personally remember having trouble with this concept equally a beginnner and wasted a lot of time reading something i would never comprehend, and then im hither writing this to brand it simpler for others to learn! Notation: I wont be covering complex state management libraries like BLoC, Redux etc.
Stateful VS Stateless
Merely for revision'southward sake,

Stateful widgets are mutable and they update their data every time a setState((){data;}) is called.
Stateless widgets on the other hand are immutable, i.e they contain information that shouldn't modify during runtime.
Module 1: Passing Data to some other Stateful Widget Course.
You tin can notice my raw files for this every bit a github gist hither → https://git.io/JLdca
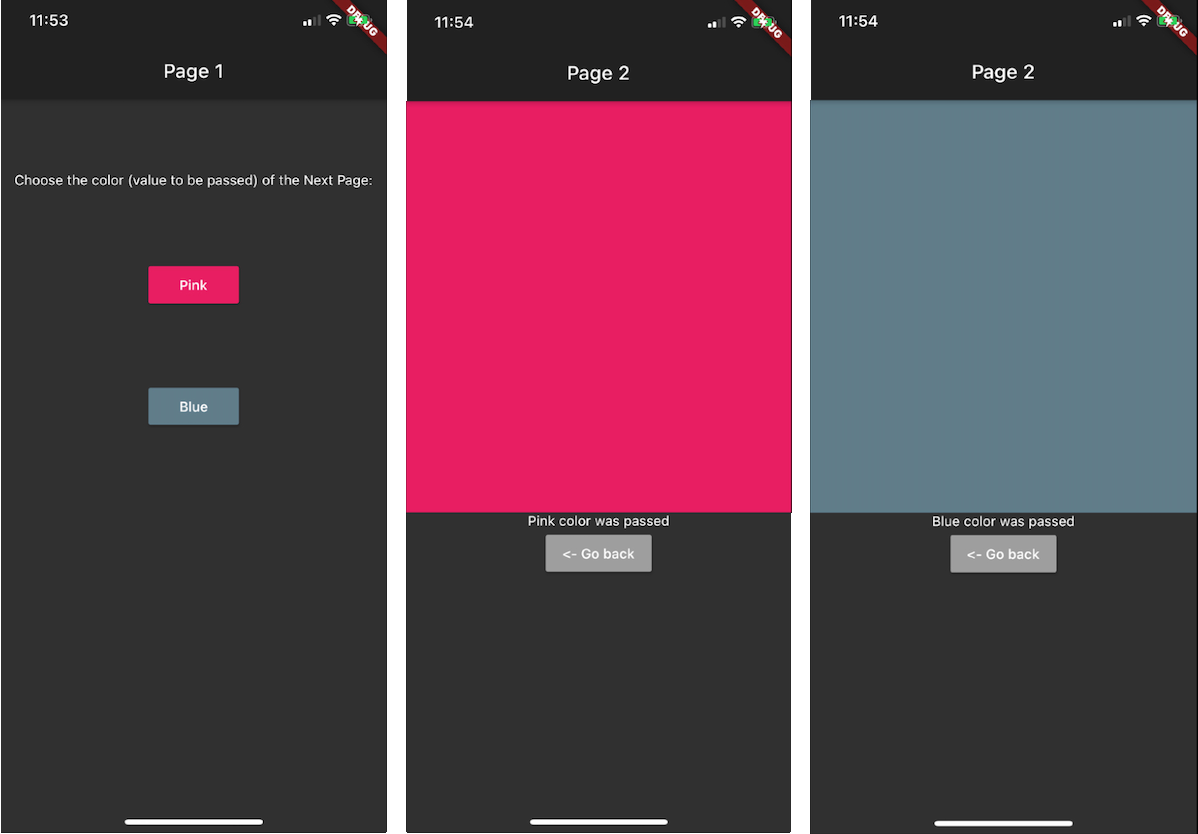
Here, we take two files (excluding main.dart): page1.dart and page2.dart . The goal is to pass Color and String datatype values from folio 1 to page 2 and display a container and text having the color and the color name that we chose on page1.
So let's start, shall we?
- page1.dart
Here on the first page, in the onPressed callbacks of the two RaisedButtons, we phone call the Navigator.push (to navigate to the 2d screen), passing the respective values of the variables, directly to the constructor of the second folio. Note that the BuildContext (here context) is the same.
              import 'page2.sprint';
course PageOne extends StatefulWidget {
                @override
                _PageOneState createState() => _PageOneState();}
class _PageOneState extends State<PageOne> {                              @override
                Widget build(BuildContext                context) {
                render Heart(
                kid: Cavalcade(
                mainAxisAlignment: MainAxisAlignment.spaceEvenly,
                children: [
                Text('Choose color to exist passed to next folio'),
                RaisedButton(                                  //push button 1
                color: Colors.pink,
                                  onPressed: () {
                                  Navigator.push(
                  context,
                                  MaterialPageRoute(
                  builder: (_) => PageTwo(
                                      passedColor: Colors.pink,
                    passedColorName: 'Pinkish',
                  ),),);},
                child: Text('Pink')),
                RaisedButton(                                  //push button 2
                color: Colors.blueGrey,
                                  onPressed: () {
                Navigator.push(
                  context,
                  MaterialPageRoute(
                  architect: (_) => PageTwo(
                  passedColor: Colors.blueGrey,
                    passedColorName: 'Blue',
                  ),),);},
                child: Text('Blueish'),
                ),],),);}}
In the highlighted code above, we tin can observe that, depending on what button is pressed, different values (Colors.pink and 'Pink' or Colors.blueGrey and 'Blue') are given to the variables passedColor (Color datatype) and passedColorName (String datatype),
After these values are passed to page2.dart, the next goal is to eat these values on the second page, for which we will be using key: key, so either apply widget.passedColor / widget.passedColorName (where we will use the raw passed values without modification), or shop them in other variables (in this case nosotros can modify the passed values). I'll explain everything in a bit.
- page2.dart
To use these values for coloring the container on our 2d page, we use keys! Every bit Emily from the Google squad quoted,
Keys preserve state when widgets move around in your widget tree. In practice, this means they tin can be useful to preserve the user's scroll location or keep state when modifying a collection.

Scratching your head mate? Don't worry hahaaha; information technology'll all come to you with practise and time, for now, all you have to exercise is analyze and retrieve the syntax that I accept highlighted in the code and if you want to go into the details, which I strongly recommend you do, read Emily'southward commodity on medium or watch her youtube: https://youtu.be/kn0EOS-ZiIc
notation: below, i am talking near the 2 approaches that a begginer would comprehend, without going into a bit complicated stuff like initState.
So, In that location are two approaches when it comes to consuming the values,
- Direct using the passed value
In this example, nosotros simply use the passed value from page 1 to folio 2 (never alter/modify information technology).
Nosotros declare a terminal property with respective datatypes and add them to the constructor as a parameter. At present the data it's attainable in the build office!
              course PageTwo extends StatefulWidget {                              terminal Color passedColor;
terminal Cord passedColorName;
                const PageTwo(
                  {Fundamental key, this.passedColor, this.passedColorName})
                                  : super(key: key);                                                                              //                                super                                  is used to telephone call the constructor of the base class which is the StatefulWidget here                                            @override
                _PageTwoState createState() => _PageTwoState();
}
class _PageTwoState extends State<PageTwo> {
                @override
                Widget build(BuildContext                context) {
                render Scaffold(
                appBar: AppBar(
                title: Text('Folio ii'),
                automaticallyImplyLeading: false,                //optional: removes the default back pointer
                ),
                body: Column(
                children: [
                Container(
                height: 400,
                width: double.infinity,
                color:                widget.passedColor,
                ),
                Text('${widget.passedColorName}                colour was passed'),                              //${} sign here prints the value of variable inside information technology.                                                                            RaisedButton(
                color: Colors.grey,
                onPressed: () {
                Navigator.pop(context);
                },
                child: Text('<- Get back'))
                ],),);},}
And then, having access to the data in the build, we can simply prepare the container's color to widget.passedColor and it should gear up the value to the value we chose on page1! YIPPEE, it works!
But… what if we wanted to modify the color on the second page? For this, we use the second arroyo
2. Storing the passed value in a different variable before using information technology
              class PageTwo extends StatefulWidget {
                final Color passedColor;
                concluding String passedColorName;
                const PageTwo({Central fundamental, this.passedColor, this.passedColorName})
                : super(key: central);                              @override
                _PageTwoState createState() => _PageTwoState(
                  passedColor: this.passedColor, passedColorName: this.passedColorName);
}form _PageTwoState extends State<PageTwo> {                                            Color passedColor;
                  String passedColorName;
                  _PageTwoState({this.passedColor, this.passedColorName});                                            @override
                Widget build(BuildContext context) {
                return Scaffold(
                appBar: AppBar(
                championship: Text('Page 2'),
                automaticallyImplyLeading: false,                  //to disable going dorsum
                ),
                body: Cavalcade(
                children: [
                Container(
                height: 400,
                width: double.infinity,
                colour:                passedColor,
                ),
                Text('$passedColorName                color was passed'),
                //$ and ${} is the same affair, {} is just used if its non one discussion                                            RaisedButton(
                color: Colors.greyness,
                onPressed: () {
                Navigator.pop(context);
                },
                child: Text('<- Go back'))
                ],),);}}
The additional steps this approach has from approach i, are the ones highlighted in a higher place,
i.east Nosotros have to add parameters in _PageTwoState() which passes the values, which then we ready to a different value (passedColor and passedColorName in this instance), which will now behave equally though they were initialized with those passed values

Congratulations on completing the get-go module! Such a quick learner! Now put on those developer shades and navigate with me to the next module. Got the pun? HA ha! Ha HA! Ahem, excuse me.
Module 2: Fetching Information from some other Stateful Widget Form.
You can find my raw files for this as a github gist here → https://git.io/JLdue
What if we needed to laissez passer data back to page i, for due east.grand we were making a settings/theme page for a small app. I volition evidence you just that.
note: since flutter by default doesnt persist app data on reload, yous will accept to apply plugins like shared preferences to wrap simple data into platform-specific persistent storage (NSUserDefaults on iOS, SharedPreferences on Android, etc.). For larger databases use sqflite and path/path provider, merely thats not of import now.
Here we besides have two files(excluding main.sprint): page1.dart and page2.sprint
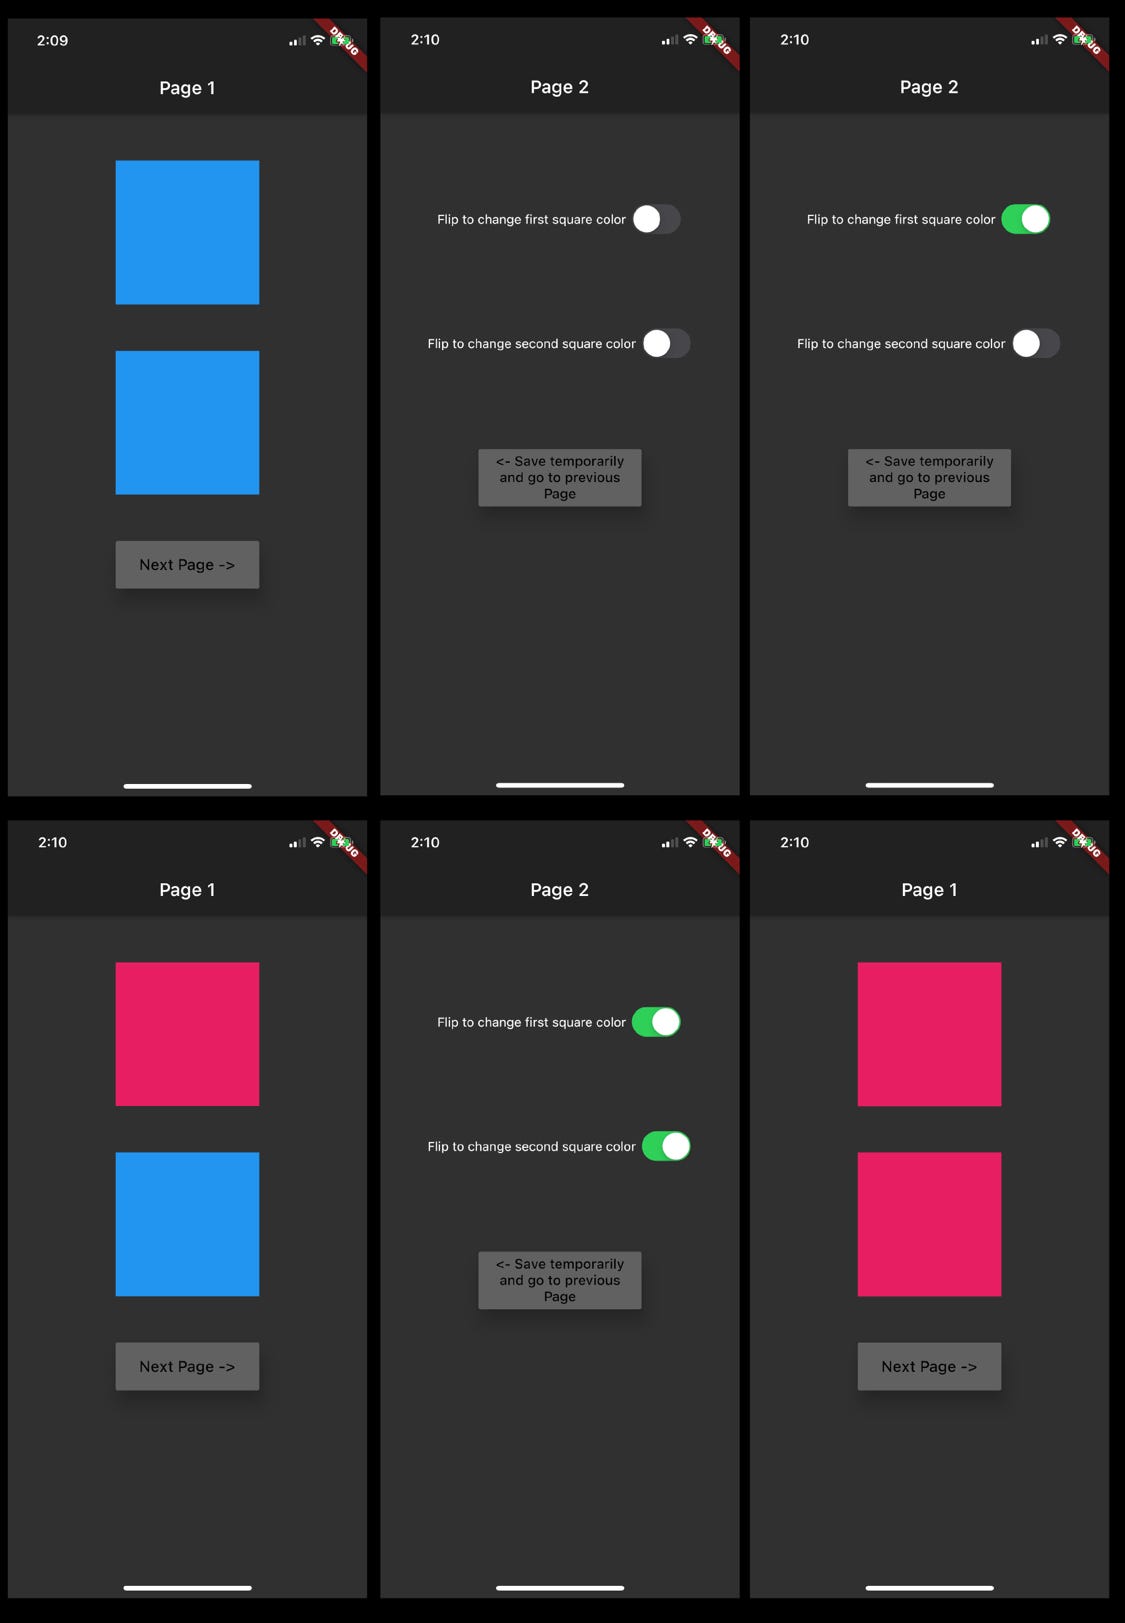
The goal hither is to navigate to folio 2, check what boolean value has the user prepare the Cupertino switches to, and if the value is true, and then alter the colour of the respective container displayed on page one to pinkish.
I used Cupertino toggles instead of buttons (which would have been style easier), just to show the possibilites and also to teach a footling virtually switches, because why not? More the noesis the merrier it is, correct?!
- page1.dart
Hither we will outset wrap the Navigator.push inside an async function and wait for its result. Then on the second screen, we will laissez passer the boolean value of the switch to the Navigator.pop dorsum to the first screen.
Basically async and await here wait for the function to first finish (do all the business on page2) before returning annihilation equally a value.
              import 'bundle:palpitate/material.sprint
course PageOne extends StatefulWidget {
                @override
                _PageOneState createState() => _PageOneState();
}
class _PageOneState extends State<PageOne> {
                bool firstSquareColor = false;                                //since blueish by default
                  bool secondSquareColor = simulated;                                                  //since blueish by default                                            _navigateNextPageAndRetriveValue(BuildContext context) async {
                final List nextPageValues = wait Navigator.push(
                context,
                                  MaterialPageRoute(builder: (_) => PageTwo()),
                  );
                  setState(() {
                  firstSquareColor = nextPageValues[0];                                                  //showtime chemical element is stored at the 0th index for a list
                                  secondSquareColor = nextPageValues[1];
});}                //lawmaking continues beneath
This in a higher place piece of code, using async and await function, takes the values popped from the page2 screen.
Now to shop these values (firstSquareColor and secondSquareColor), nosotros use a list (here called nextPageValues), which stores values equally its elements.
              @override
                Widget build(BuildContext                context) {
                return Center(
                child: Cavalcade(
                mainAxisAlignment: MainAxisAlignment.spaceEvenly,
                children: [
                Container(
                height: 150, width: 150,
                color:                firstSquareColor == false ? Colors.blue : Colors.pink),
                Container(
                summit: 150, width: 150,
                colour:                secondSquareColor == false ? Colors.blueish : Colors.pinkish),
                //code continues below
The lawmaking above is for the two colored containers which check if the values firstSquareColor and secondSquareColor (which we prepare equally the values we volition get from page two after) are true or false, using something called as a ternary operator in flutter,. Ternary operators have the syntax → condition ? trueStatement : falseStatement . Hence they part as a shorter form of an if else statement.
If the value is truthful, that means the switch on next folio has returned true (its toggled on), so we now set the color to pink.

                              Container(
                summit: fifty, width: 150,
                child:                RaisedButton(
                peak: 15,
                colour: Colors.grey[700],
                child: Text(
                'Next Folio ->',
                fashion: TextStyle(colour: Colors.blackness, fontSize:
                17),),                              onPressed: () {
                  _navigateNextPageAndRetriveValue(context);
                  },                                                            ),),
                ],),);}}
This above greyness container is the navigator for the adjacent page. Nosotros have already made a function _navigateNextPageAndRetrieveValue, which we volition at present call and laissez passer the same context to it.

- page2.dart
At present that we accept written the lawmaking in page1.dart to accept values using async-look and modify container color according to the values accustomed,
Our next goal is to read the value that the user has given to the Cupertino toggle on page2, which we volition store in new boolean variables (chosen firstValue and secondValue), then Navigator.popular these values as a list to page1.
              grade PageTwo extends StatefulWidget {
                @override
                _PageTwoState createState() => _PageTwoState();
}
grade _PageTwoState extends State<PageTwo> {
                bool firstValue = false;
                  bool secondValue = false;
                                //lawmaking continues beneath
Notation: Unless stored in device persistent storage using plugins like shared preferences, these two values above (firstValue and secondValue) will always default back to 'false' on app restart / re-navigation to the page.
              @override
                Widget build(BuildContext context) {
                render Scaffold(
                appBar: AppBar(
                title: Text('Folio 2'),
                automaticallyImplyLeading: imitation,                //to disable going to page1 when used swipe right ios gesture on the screen, because we want to pop the values, when we navigate back, which nosotros are only doing information technology hither with a RaisedButton
                ),
                trunk: Column(
                mainAxisAlignment: MainAxisAlignment.spaceEvenly,
                children: [
                Row(
                mainAxisAlignment: MainAxisAlignment.center,
                children: [
                Text(
                'Flip to change first square color ',
                textAlign: TextAlign.center,),
                Container(
                child:                CupertinoSwitch(                                //offset switch
                  value: firstValue,
                  onChanged: (bool value) {
                  setState(
                  () {
                  firstValue = value;
                  },);},),
                ),],),
                Row(
                mainAxisAlignment: MainAxisAlignment.center,
                children: [
                Text(
                'Flip to change second square color ',
                textAlign: TextAlign.center,
                ),
                Container(
                child:                CupertinoSwitch(                                //2d switch
                  value: secondValue,
                  onChanged: (bool value) {
                  setState(
                  () {
                  secondValue = value;
                  },);},
                ),),],),
//lawmaking continues beneath 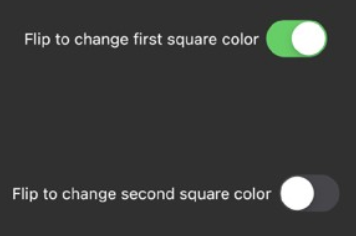
The value is set to true in the first example, so the boolean variable firstValue is as well gear up to true, in the second instance the value is defaulted to fake, since it seems to be untouched by the user, so secondValue remains set to faux.
                              Container(
                top: 60,
                width: 170,
                child:                RaisedButton(
                elevation: 15,
                colour: Colors.grey[700],
                child: Text(
                '<- Salve temporarily and go to previous Page',
                textAlign: TextAlign.center,
                manner: TextStyle(colour: Colors.black,
                fontSize: 15),
                ),
                onPressed: () {
                  Navigator.pop(context, [firstValue, secondValue]
                  );                                //multiple values are passed using a listing
                  },
                ),),
                ],),);}}
Finally!, we put these values in Navigator.pop(context, [valueOne, valueTwo]) as shown to a higher place, which should come inside an onPressed of a RaisedButton.

SUMMARY Fourth dimension!
In page1.dart, we had a function named _navigateNextPageAndRetriveValue (called past an onPressed of a RaisedButton later in the lawmaking with passed context), which created a new listing called nextPageValues.
This new list awaited for the Navigator.push to pop the result passed as a list in page2.dart. On receiving the listing of boolean values, it stored them as its elements, which later are then given to a different boolean variables (firstSquareColor and secondSquareColor) using firstSquareColor = nextPageValues[0]; and secondSquareColor = nextPageValues[1];
So nosotros used ternary operaters and then know the value of these variables and gear up the color respectively!
Congrats! y'all completed still some other module, what a legend.
Now that we have completed the harder function, we come up to a part that shows how easy it is to pass data between stateless widgets since there is not much need here as the Widget being Stateless, itself wouldn't refresh during runtime. I will also embrace how to write clean code and be a better developer in the side by side and last module.
Module 3: Passing data between Stateless Widgets and making custom widgets to write cleaner lawmaking
You tin can find my raw files for this every bit a github gist here → https://git.io/JLdHK
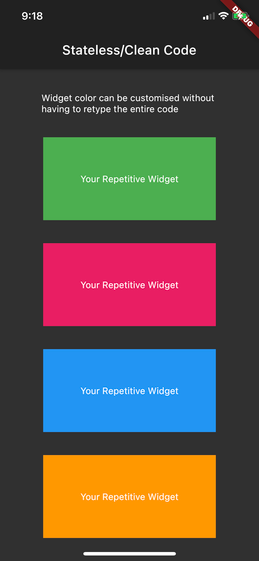
The goal here is to make a custom widget that displays a container and the color passed to it, this not only helps us write less lawmaking merely also makes it easier to debug and understand afterwards.
              void chief() {
                runApp(MyApp());
}
form MyApp extends StatelessWidget {
                @override
                Widget build(BuildContext context) {
                return MaterialApp(
                theme: ThemeData.dark(),
                abode: Scaffold(
                appBar: AppBar(
                title: Text('Stateless/Clean Code'),
                ),
                body: StatelessOne(),),);}
}
class                StatelessOne                extends StatelessWidget {
                @override
                Widget build(BuildContext context) {
                render Middle(
                kid: Column(
                mainAxisAlignment: MainAxisAlignment.spaceEvenly,
                children: [
                Text(
                'Widget colour tin be customised without \nhaving to retype the entire code'),                                                StatelessTwo(myColor: Colors.green),
                StatelessTwo(myColor: Colors.pinkish),
                  StatelessTwo(myColor: Colors.blue),
                  StatelessTwo(myColor: Colors.orange),                                            //calling the custom widget which we will make beneath                                            ],),);}
}
Equally we can meet from the above app screenshot, we need to brand four similar containers which only differ in colour. Hence, instead of writing the whole container code and giving each of them the same properties like height and width once again and again, we come with a cleaner solution.
Nosotros make a custom widget! and using my extreme creative skills name it StatelessTwo.
Equally y'all tin can see below, this new custom widget has a final class property of type Color called myColor. Then we take a constructor that will construct the object. Now within the build, we will put the part that was supposed to exist repetitive, container in this example, and assign the myColor variable to the values that are meant to be changed later on. Of course, the container colour in this case.
You're all set! , at present just call this widget as a child inside your StatelessOne by typing StatelessTwo(myColor: Colors.yourchoice); As well now this custom widget should work just similar a container that has fixed peak and width but variable color.
              form                StatelessTwo                extends StatelessWidget {
                concluding Colour myColor;
                  StatelessTwo({this.myColor});
                @override
                Widget build(BuildContext context) {
                return Container(
                top: 120,
                width: 250,
                color:                  myColor,
                child: Center(child: Text('Your Repetitive Widget')),
                );}
}
Bonus Knowledge! : Positional arguments vs Named Arguments for the constructor:
Positional Arguments: These simply take values in the same order equally they are passed in. Syntax:
1)StatelessTwo(this.myColor, this.someOtherValue); → Constructor. ii)StatelessTwo(yourColor, yourSomeOtherValue); → Calling.
Since we accept only one value (myColor) that is passed, we can use Positional Arguments, but i have used named, since i personally feel its a good practise.
Named Arguments: Sometimes we have too many arguments and it becomes difficult to retrieve the guild, hence in such cases we use named arguments. Here the order in which we pass them doesnt affair. Syntax:
1)StatelessTwo({this.myColor, this.someOtherValue}); → Constructor. two)StatelessTwo(someOtherValue: yourSomeOtherValue, myColor: yourColor); → Calling. (come across we tin can interchange like this and it wouldnt affair)
To conclude,
With the help of this commodity, I hope you understood :
- About the unproblematic ways in which nosotros could pass and fetch values from widgets, may information technology exist a Stateful or a Stateless one.
- How to write cleaner code and split your app into custom widgets.
Give thanks you for reading! If u have any doubts/suggestions or institute something I wrote incorrectly in this article, yous can feel free to put it in the comments or electronic mail me: yaashwardhan@gmail.com. I accept linked the respective GitHub gist in every module. Just think,
"Knowledge is Ability. Knowledge Shared is Power Multipled"
Source: https://medium.com/swlh/the-simplest-way-to-pass-and-fetch-data-between-stateful-and-stateless-widgets-pages-full-2021-c5dbce8db1db
0 Response to "Read the Modules for the Cs Ta Class Before Class Next Week"
Postar um comentário